

How To Draw A Resting Hand
Of all parts of the trunk, the manus is by many considered to exist the hardest to describe. Nosotros all have stories of how, early on on, we would proceed our characters' hands behind their backs or in their pockets, avoiding as much as possible the task of tackling hands. Yet paradoxically, they are our nearly readily available reference, existence in our field of vision every moment of our lives. With only one extra accompaniment, a small mirror, nosotros can reference easily from all angles. The only real challenge, and so, is the complexity of this remarkably articulated organ: information technology's most like cartoon a pocket-size figure onto a larger one, one doesn't know where to start.
In this tutorial we will deconstruct the mitt's own beefcake and indeed demystify information technology, so that when you look at a manus for reference, y'all can make sense of it as a group of simple forms, like shooting fish in a barrel to put together.
I employ the following abbreviations for the fingers:
- Th = thumb
- FF = forefinger
- MF = eye finger
- RF = ring finger
- LF = picayune finger
Basics of the Hand
Hither's a quick look at the bone structure of the manus (left). In blue, the viii carpal basic, in royal, the five metacarpal bones, and in pink, the 14 phalanges.
Equally many of these bones cannot motion at all, we can simplify the basic structure of the manus: the diagram on the correct is all you really need to remember.


Annotation that the bodily base of the fingers, the joint that corresponds to the knuckles, is much lower than the apparent base formed by flaps of pare. This will be of import to depict angle fingers as we will see after.
Based on the above, a unproblematic style of sketching the manus is to start with the bones form of the palm, a apartment shape (very much like a steak, simply roundish, squarish, or trapezoidal) with rounded angles, and then adhere the fingers :


If you have a difficult fourth dimension cartoon fingers, it'due south very helpful to think of them, and describe them, as stacks of iii cylinders. Cylinders are easy to depict under whatsoever angle, taking away much of the headache of cartoon fingers in perspective. Discover how the bases of the cylinders are exactly the folds y'all demand to draw when the finger bends.


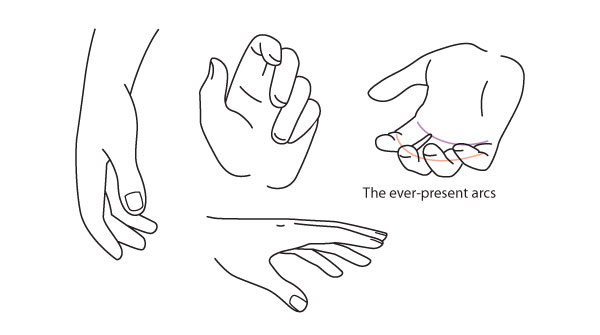
This is of import: The joints of the fingers are non aligned on direct lines, but fall onto concentric arches:


In addition, fingers are not directly, simply bend slightly towards the space between MF and RF. Showing this fifty-fifty subtly gives life to a drawing:


Let us not forget the fingernails. In that location is no need to always depict them, indeed they are a caste of detail that simply looks right when the easily are seen sufficiently close upwardly, merely nosotros are not usually taught how they should wait, and because of this, I for one couldn't brand them look right for a long time. Hither are some notes on the fingernail:


- The fingernail starts halfway up the height joint of the finger.
- The point where fingernail detaches from mankind varies: some people have it all the mode at the edge of the finger, others have it very depression (dotted line), so in their case the fingernails are wider than they are long.
- Fingernails are non flat, simply shaped much like roof tiles, with a curvature ranging from extreme to very slight. Notice your hand and you lot may find that this curvature is different for each finger – but this level of realism is unnecessary in drawing, fortunately.
Proportions
Now, taking the (apparent) length of FF as our base of operations unit, we tin roughly put down the following proportions:


- The maximum opening betwixt Th and FF opening = i.5
- The maximum opening between FF and RF = 1. The MF can be closer to either without affecting the full altitude.
- The maximum opening betwixt RF and LF opening = 1
- The maximum angle between Th and LF is 90º, taken from the very base of the Thursday's joint: the fully extended LF is aligned with it.
I said "roughly" because these do vary with people, sometimes a lot, but call up that diffusive from the norm on paper tin can look wrong. If in doubtfulness, these measurements will always wait correct.
Details
The basic shape is only one challenging aspect of the manus; the other may be the detailing of folds and lines. Who hasn't been frustrated by cartoon a hand and not being able to get all these lines to look right? Let's look at fold lines and some measurement details:


- The virtual extension of the inner line of the wrist separates the pollex from the fingers. A small tendon line may mark the junction of wrist and hand.
- When fingers are close together every bit to a higher place, the pollex tucks a chip under the palm and is partially hidden.
- The FF or RF as sometimes about as long as the MF.
- The folds that mark the knuckles are elliptical or like parenthesis, but when the hand is flat as to a higher place they are not pronounced (unless someone has protruding knuckles, which happens on much-labored hands) and can be drawn equally mere dimples.
- The folds of the finger joints show elliptically on the back side, but they fade when the fingers are bent. They evidence every bit parallel lines on the palm side, simply they are more pronounced at the lower articulation – typically you lot wouldn't utilize ii lines for the upper joints.
- From the back, the lines of the fingers extend downwards to the limit of the palm, which makes the fingers look longer from the back.
From the within, the lines are shorter because the acme of the palm is padded, so the fingers wait shorter on the palm side. - The lines of the fingers end in are drag lines (these short horizontal dashes) on both sides, and on both sides these drag lines all point away from the MF.
Note likewise, in the diagram in a higher place, how the fingernails are not drawn fully but indicated in a subtle way advisable to the overall level of detailing (which is rather higher than necessary, for purposes of showing all the lines). The smaller the hand you're drawing, the less item y'all want in it, unless you want it to wait old.
I didn't mention the lines of the hand above, and then allow's take a look at them closely here:


- The most visible lines in the palm: the and so-chosen heart, head and life lines, are where the skin folds when the palm is cupped. Unless your way is very realistic, there's no need to draw others, it will look excessive.
- Don't confuse the life line with the profile of the thumb, which becomes visible under sure angles such as the one on the right. The life line is almost concentric with the contour of the thumb, just encounter how much higher on the palm it originates – the (truthful) base of the FF, in fact.
- From the side, the padding at the base of operations of each finger appears every bit a series of curved, parallel bulges.
- These fold lines wrap halfway around the fingers. They are accentuated as the finger bends.
- There is a small bump here on the extended finger due to skin bunching upwards. The bump disappears when the finger bends.
Now, what do nosotros meet when the hand is extended and seen sideways?


- Outside, the wrist line curves out into palm base, so the transition between the two is marked by a gentle bump.
- The bottom of the hand looks flatter from the exterior than it does from the inside, although the thumb base may still exist visible.
- From the outside, the RF's last articulation is fully exposed because the LF is set well back.
- From the inside, a petty or none of the MF tin exist visible, depending on the FF'due south length.
- Inside, the wrist line is covered by thumb base, so the transition is more abrupt and the bump more important.
Note also that when seen from the outside, the palms shows another, new contour line. Information technology starts at the wrist and, as the hand turns more, joins up with the LF line, until it covers upwards the Th base:


Range of Motility
Detailed articulation implies movement, and the hands move constantly. Not just for functional uses (holding a mug, typing) but as well expressively, accompanying our words or reacting to our emotions. It's therefore no surprise that drawing hands well requires understanding how the fingers movement.
The Thumb and Fingers
Let'due south start with the thumb, which works alone. Its existent base of operations, and heart of motion, is very depression on the hand, where it meets the wrist.


- The natural relaxed position leaves a infinite betwixt the Th and the residue of the paw.
- The Thursday tin fold in as far as touching the root of LF, but this requires much tension and quickly becomes painful.
- The Th can extend as far equally the width of the palm, but this also implies tension and gets painful.
The other four fingers have little sideways movement and mainly curve frontward, parallel to each other. They can do this with a certain degree of autonomy, merely never without some effect on the nearest fingers; try for case to bend your MF alone, and run into what happens to the rest. The Th solitary is completely independent.
When the hand closes into a fist and the fingers all coil together, the whole of the hand maintains a cupped shape, as if information technology was placed against a big ball. Information technology'due south just that the brawl (here in scarlet) gets smaller and the curvature stronger:


When the manus is fully extended (on the right), the fingers are either direct or curve slightly backwards, depending on flexibility. Some people'south fingers can curve back 90º if pressure level is practical against them.
The fully closed fist is worth a detailed await:


- The 1st and third fold of the fully bent finger meet, creating a cross.
- The second fold appears to be an extension of the line of the finger.
- Part of the finger is covered by the flap of pare and the thumb, a reminder that the whole thumb construction is outermost. Y'all can make your FF slip outside and cover the flap of skin, it'due south anatomically possible, but it is non a natural way to class a fist.
- The MF's knuckle protrudes nigh and the other duke autumn away from information technology, so that from the angle shown here, the parallel fingers are visible from the outer side, not from the inner side.
- The 1st and third fold meet and create a cross again.
- The thumb bends and then that its final section is foreshortened.
- The skin fold here sticks out.
- When the mitt makes a fist, the knuckles protrude and the "parenthesis" are visible.
The Manus as a Whole
When the hand is relaxed, the fingers curl slightly – more and so when the hand is pointing up and gravity forces them bent. In both cases, the FF remains straightest and the rest fall away gradually, with the LF being the most bent. From the side, The gradation in the fingers makes the outer ii or 3 peek out betwixt FF and Th.

LF frequently "runs away" and stands isolated from the other fingers – another manner of making easily expect more natural. On the other hand, the FF and MF, or MF and RF, will often pair upwardly, "sticking" together while the other 2 remain loose. This makes the hand expect more than lively. RF-LF pairings also occur, when the fingers are loosely aptitude.


Since the fingers are not the same length, they always nowadays a gradation. When grasping something, similar the cup below, the MF (ane) wraps the most visibly around the object while the LF (2) barely shows.
When holding a pen or the like, MF, RF and LF curl back towards the palm if the object is held simply betwixt Th and FF (pick up a pencil lightly and observe this). If more pressure level is practical, MF participates and straightens upwardly as it presses against the object. Full force per unit area results in all the fingers pointing away as shown here.


As nosotros accept seen, the hand and wrist are remarkably articulated, each finger about having a life of its own, which is why easily tend to stump the beginning illustrator. All the same when the hand starts to make sense, we tend to fall into the reverse trap, which is to depict hands too rationally – fingers carefully taking their places, parallel lines, conscientious alignments. The result is stiff and simply too tame for a part of the trunk that can speak as expressively as the eyes. It tin can work for sure types of characters (such as those whose personality shows stiffness or insensitivity) but more often than not, you'll want to depict lively, expressive hands. For this you can go one of two ways: add together mental attitude (i.e. add together drama to the gesture, resulting in a dynamic hand position that would probably never be used in existent life) or add natural-ness (observe the easily of people who aren't thinking well-nigh them to see the casualness I'm referring to). I tin't perchance show every paw position there is, but I give below examples of constrained vs. natural/dynamic hand:


*Note in this detail case – trained fighters will ever hold their fingers parallel while punching (every bit in the forced position), otherwise they may interruption their knuckles.
Diversity
Hands vary individually just every bit much as facial features. Males'due south easily differ from female person'south, young from one-time, and then on. Beneath are some existing classifications, but they don't embrace the whole range of characters a mitt tin have. Grapheme is a adept word because information technology's most useful to draw hands equally if they were characters with their own personality: delicate, soft, dry, callous, uncouth so on. (Run into Practice Fourth dimension)
Hand Shapes
This is really nearly the proportion of fingers to hand:


Finger Shapes


Even fingernails are not all the aforementioned! Well, Mother Nature gives usa flat or round blast bases, really, and the different means of styling the smash are man-made.


Practice time
- Detect people's easily. First, for anatomy: how the fingers look in various positions, how lines prove and change, how certain details are dependent on tension, etc. Second, for diversity: how do male hands differ from female easily? How practice they modify with age? With body weight? Could you recognize someone past their hands?
- Make quick energy sketches of easily, from any source – yours, other people's, photos. Y'all can detect some stock photos of hands on Envato Marketplace. Don't worry almost your sketches having correct proportions or even looking similar much; this is about capturing expression.


- Describe your own hands in diverse positions and, using a mirror, from various angles, making sure to deconstruct them into the simplest possible forms (the equivalent of drawing a stick figure then fleshing it out). You tin can too start with the energy sketch and build on that (equally nosotros have done with the full figure) earlier finally refining the details. In the sketches below the nether-sketch is very lite but in some you lot tin can simply encounter the broad unproblematic shapes used.


Source: https://design.tutsplus.com/tutorials/human-anatomy-fundamentals-how-to-draw-hands--cms-21440
Posted by: whisleroulty1966.blogspot.com
0 Response to "How To Draw A Resting Hand"
Post a Comment